Update 2 (May 15 2025)
While prepping the next few videos I found more improvements I need to make (particularly to keep power consumption down — stay tuned for Part 3 where I go into that). So I’m going to wait to send out my final order for the PCBs. I’m sure you want to learn more about the final product first and make sure I know what I’m doing before placing an order anyway. So expect a time frame of about 1 month after Part 3 comes out.
Update (Apr 16 2025):
Hey all! So I had some PCBs ready to go but I found some revisions I needed to make (more info coming out in a future vid) and decided I should just wait until the new boards are done. So this will take another month or so — some parts require some lead time.
I wish I could do pre-orders but there are no good services that will let me do this. And don’t think there’s enough initial demand for a Kickstarter. But to help me gauge interest to figure out how many PCBs I should order, how about leaving a comment below? I set it up so you don’t need to enter an email (hate sites that do that).
Anyway, so here’s the info you were looking for:
What you get:
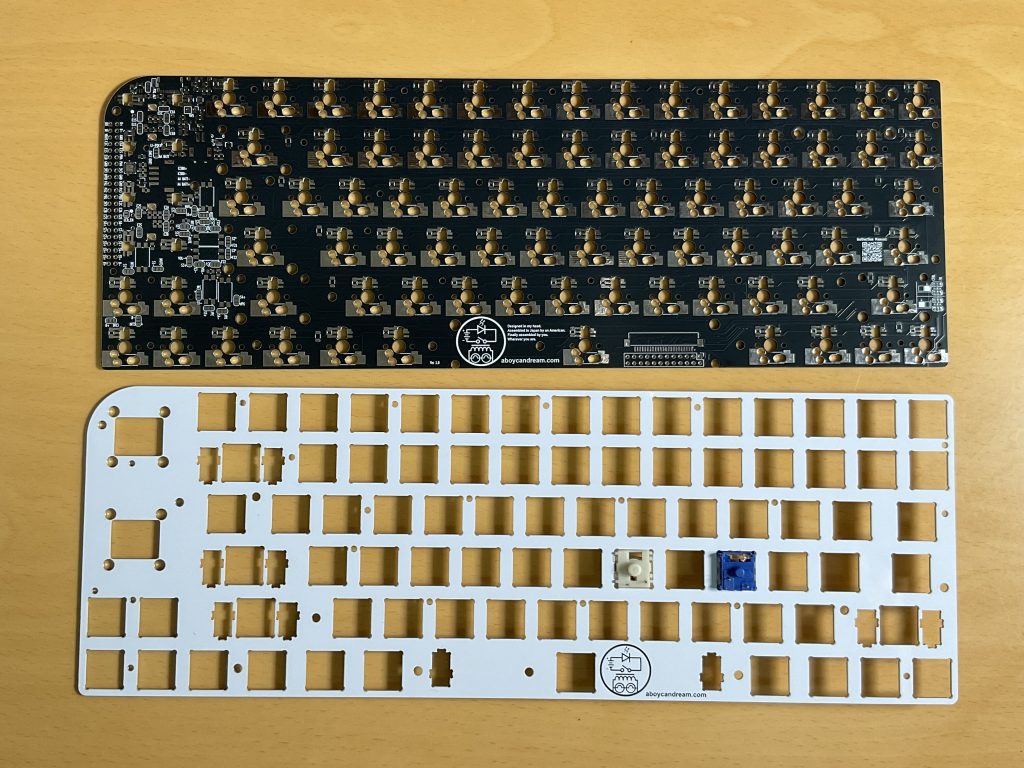
- PCB and Top Plate — Note: Image above does not have components installed but all components for encoder, li-poly charging via USB-C, and neopixel/led power management will be installed. Please note that no neopixels or leds are included.
- 2 Encoders — You will need to solder these on yourself but they are through-hole and quite easy to solder. You will also need your own knobs. They are standard size and can be easily sourced on Aliexpress. I will also provide 3D printer files so you can print and modify them however you want.
- 23-Pin Ribbon Cable — To connect to your K380 PCB.
- Pre-wired 6-Pin JST Cable and Connector — So you can connect power to the K380, connect AAA or AA batteries (if you want to power that way), and connect a power switch (not included).
Price:
Shooting for $39.99 for the PCB and Top Plate. Plus shipping (from Japan), which will come out to about $10 to the USA (and probably Europe). This is around the price for selling myself on my website. If I need to sell through sites like Tindie, this could go up because of their fees.
What you still need yourself:
- Switches — Will give more info on this in a future vid, but I would only consider a build with MX switches right now. The Gateron Low-Profiles work but you will need to make your own Stabilizers (don’t think they make or sell these anywhere). And to make your own (I will tell you how and give you all the files), you will need a resin 3D printer. Not an FDM, but a resin printer only because we need to reliably print down to .1 mm height!
- Sockets
- Keycaps
- Stabilizers
- A Case — The tough part of what would normally make this build available to all. If you have a 3D printer (FDM or resin), you’re golden. I’ll provide you with all the files you can modify and print yourself. If you don’t have a 3D printer, you can use my files and contact print services that will print for you. I am also looking for a cheap set-up that will just use an acrylic sheet for a cheap build but that is not in the works yet.
- Li-Poly Battery (optional)
- Neopixels or LEDs (optional) — Neopixels aren’t so bad to solder. I don’t think the single color led build would be for most. You would need to feel comfortable soldering 1206 LEDs and every LED will also need its own 1206 resistor.
Specs:
- PCB thickness: 1.6 mm
- Aluminum Top Plate: 1.2 mm
- ATtiny 3227 Series 2 Chip — Didn’t cheap out here. Got the highest spec chip they make. 32KB Flash with more pins.
- 7 GPIO Pins Available — Kept standard SPI and I2C pins untouched so you can do with them what you like.
- 3.3V logic, but 4.5V is available (if using li-poly) and 5V is accessible (if using USB-C)
- Polarity Protection for AAA/AA battery use
- Li-poly charge rate can be set to 500mA or 1A
Future Stuff:
There really is a lot of stuff you can do with the Arduino side of this keyboard. I’ll add a separate page to list them all. But here are just some ideas:
- Loads of backlighting stuff: Proximity or vibration sensors to wake. Custom routines for the neopixels. How about adding a sound sensor to turn your keyboard into a graphic eq display? You could even create a small base with pogo pins for your keyboard to sit on so you can run the leds at full juice when at the desk and still have it turn into a battery-sipping monster when you want to take it on the go.
- Making use of modifier keys (Ctrl, Opt, etc) can expand the capabilities of your encoders. So pressing the center button could allow you to change what the knob does on the fly. Using this with neopixels would give you a visual indicator of what mode you’re in.
And still more to come!